
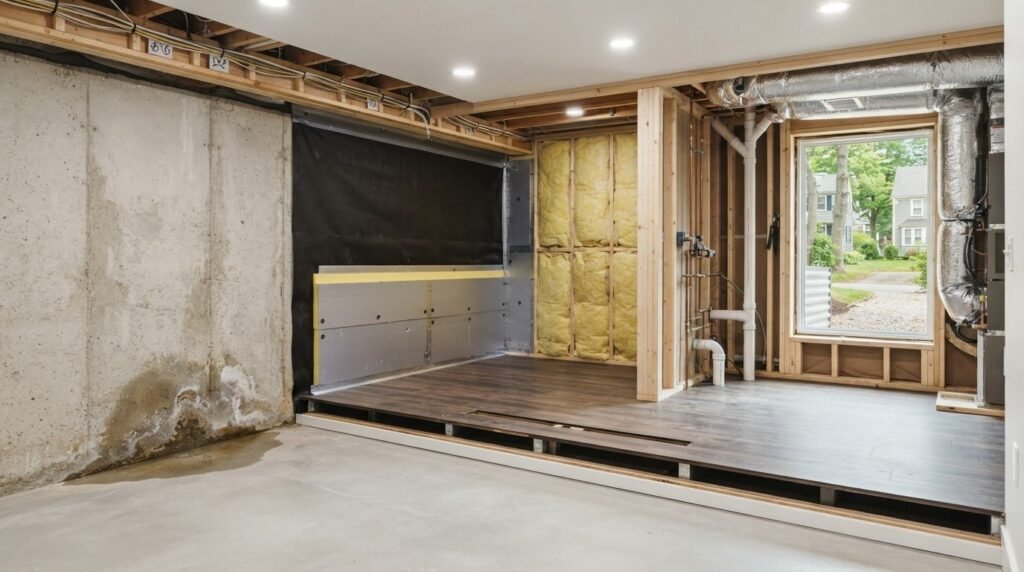
The costliest part of finishing a lower level isn’t the custom cabinetry or luxury flooring; it is the moisture quietly trapped behind your new drywall. If you are planning an upgrade in Greater Boston or the North Shore, understanding the critical basement renovation mistakes to avoid will save you significant time, stress, and money before framing even begins.
You likely envision a warm family media room, a home gym, or an extra bedroom that expands your usable living space and builds lasting home equity. Still, it’s completely natural to feel uneasy about lingering damp odors, rigid ceiling height requirements, or municipal permit rules that vary from town to town across Massachusetts.
This guide reveals the essential structural, permitting, and moisture-management missteps that can derail a project before you hammer a single nail. We will walk through proper insulation barriers, local egress codes, and reliable material selections so you can transform your basement into a safe, code-compliant retreat that adds genuine comfort and value to your home.
Key Takeaways
- Test concrete slabs and resolve foundation dampness before construction begins to keep moisture from ruining your finished floors and framing.
- Navigating town permits and mandatory egress requirements is one of the most critical basement renovation mistakes to avoid, since Massachusetts building departments enforce strict life-safety standards for habitable rooms.
- Choose materials engineered for below-grade environments; continuous thermal insulation and specialized subfloors prevent the trapped condensation common with standard fiberglass batts.
- Plan dedicated heating, balanced airflow, and proper mechanical clearances so your furnace, water heater, and electrical panel remain code-compliant and easily serviceable.
- Design with layered LED lighting and open traffic flows to ensure your lower level feels like a natural, welcoming extension of your main living space.
Ignoring Foundation Moisture and Water Management Before Starting Construction
Rushing straight into stud framing over raw concrete is one of the most destructive basement renovation mistakes to avoid. Concrete is porous by nature, acting like a dense, rigid sponge against damp ground. Capillary action draws liquid groundwater upward through microscopic pores in the concrete slab, releasing vapor directly into the home. When you install standard wood framing and drywall over wet masonry, moisture gets trapped in the wall cavity. Within months, hidden mold colonies spread behind finished surfaces, degrading air quality and warping expensive floorboards.
Smart remodelers always conduct baseline moisture testing prior to ordering lumber. You can run a simple, DIY plastic sheet test by taping heavy poly sheeting to several areas of the concrete slab for 48 hours, or use a professional calcium chloride test kit to measure moisture vapor emission rates. Settling cracks, seasonal freeze-thaw shifts, and external hydrostatic pressure must be addressed before framing begins, ensuring your investment stays permanently dry. If substantial settling or structural cracking has compromised the base, homeowners should explore Slab Foundation Repair methods to ensure the subgrade is fully stabilized.
Diagnosing Hydrostatic Pressure and Concrete Vapor Drive
Look closely at your foundation walls for efflorescence, the chalky white mineral salt left behind when water evaporates through concrete. Inspect the corners for hairline cracks that seep after heavy spring snowmelt. Outside, check that gutters are clear, downspout extensions discharge water at least six feet away, and soil slopes gently away from your foundation.
Addressing Sump Pumps and Drainage Systems Early
Subterranean water management requires active protection before building out living areas. Relying on an aging, single pump invites disaster during severe coastal storms. For long-term durability and safety, consider these mechanical safeguards:
- Dual-Pump Protection: Install a high-capacity primary sump pump accompanied by a dependable battery-powered backup system that activates during grid outages.
- Internal French Drains: If water routinely enters where the floor meets the foundation wall, cut the slab perimeter to install perforated drain piping bedded in crushed stone before framing.
- Dedicated Discharge Lines: Route discharge pipes so they exit well beyond the foundation perimeter, preventing recycled pooling against basement walls.
Establishing these water-diversion layers guarantees that your new space meets modern building codes designed to protect occupant health, giving you true peace of mind before interior finish carpentry starts.
Skipping Local Massachusetts Building Permits and Mandatory Egress Codes
Attempting to bypass the municipal permitting process ranks among the most hazardous basement renovation mistakes to avoid. While skipping town hall paperwork might seem like an easy way to trim weeks off your schedule, unpermitted construction carries severe long-term consequences. Municipal building inspectors can issue immediate stop-work orders, levy fines, or force contractors to tear down completed drywall to inspect hidden rough-ins. When the time comes to sell your property, unpermitted square footage cannot be legally marketed as finished living space, creating major appraisal hurdles and closing delays.
Every municipality across the North Shore and Greater Boston enforces local interpretations of state building regulations. Always confirm specific requirements directly with your town building department before ordering materials or excavating foundation perimeter walls. Taking a meticulous approach ensures your new space is completely legal, safe, and protected under your homeowner’s insurance policy.
Navigating Town Permits and Inspection Timelines
Transforming utility space into conditioned living quarters requires formal architectural plans that clearly detail structural framing, emergency escape routes, and fire-blocking materials. Massachusetts standards mandate several distinct inspection checkpoints during construction:
- Rough Framing Inspection: Confirms wall placement, load-bearing header sizing, and proper fire-stopping barriers between stud bays and ceiling joists.
- Mechanical and Trade Sign-Offs: Requires licensed professionals to pull trade-specific permits and receive approvals for electrical cabling, lighting layouts, and plumbing supply lines.
- Final Inspection and Occupancy: Concludes with a walk-through verifying smoke and carbon monoxide detector wiring, handrail placement, and clear egress paths.
Adhering to Emergency Egress and Ceiling Height Regulations
Life-safety compliance forms the backbone of any habitable lower-level remodel. If your design includes a designated sleeping room, state code requires a compliant emergency escape opening. An egress window must provide an accessible escape route to the exterior, accompanied by an excavated window well with an integrated ladder if the opening sits below ground grade. Always check property line setbacks before trenching outside.
Finished ceiling heights present another critical planning hurdle. Most habitable rooms require a finished ceiling height of seven feet, though local inspectors may permit slight allowances around boxed-in structural steel beams or mechanical duct runs. Proper planning also protects your home’s air quality, aligning with federal guidelines noting that The Key to Mold Control is Moisture Control. If you want experienced support balancing regional requirements and architectural plans, you can request a project consultation to review your layout with a local general contractor.
Selecting the Wrong Insulation, Vapor Barriers, and Subfloor Materials
Treating a below-grade room like an upstairs bedroom is among the most frequent basement renovation mistakes to avoid. New England basements face intense seasonal shifts, from humid coastal summers to freezing winter ground temperatures. In towns like Beverly, Melrose, and Salem, foundation walls remain chilly year-round. When homeowners install standard paper-faced fiberglass batts between wood studs against raw foundation walls, warm interior air hits the cold masonry and condenses. The organic paper and standard lumber quickly absorb this moisture, cultivating unseen fungal decay behind newly painted walls.
Successful installations rely strictly on inorganic materials engineered to handle below-grade conditions. Avoiding double vapor barriers is equally vital. Sandwiched layers of clear polyethylene sheeting trap ground moisture inside wall cavities, creating an incubator for hidden rot. Wall assemblies must always be designed to dry naturally.
Continuous Foam Insulation vs. Cavity Fiberglass Batts
Modern building science favors continuous insulation over traditional cavity batts. Adhering rigid extruded polystyrene (XPS) boards or applying closed-cell spray foam directly against concrete eliminates cold voids where moist summer air condenses. By establishing an airtight thermal break between the earth-chilled foundation and interior framing, you keep interior stud cavities warm and dry. Every seam between rigid panels must be taped with specialized acrylic flashing tape to stop air leaks before building non-structural partition walls.
Engineered Subfloor Panels and Resilient Flooring Choices
Directly gluing engineered planks or rolling carpet pads over bare concrete floors often leads to ruined flooring and unpleasant musty smells. Slabs continuously release small amounts of moisture vapor. Protect your investment by incorporating engineered subflooring layers designed for moisture management:
- Dimpled Air-Gap Underlayments: Lay down dimpled polyethylene drainage membranes to create a small ventilation space beneath finished floors, allowing moisture vapor to dissipate harmlessly.
- Insulated Tongue-and-Groove Panels: Install modular OSB panels bonded to rigid foam underlayment to warm the walking surface and prevent cold winter drafts.
- 100% Waterproof Surface Finishes: Finish the floor with luxury vinyl tile (LVT) or glazed porcelain tile rather than solid organic hardwoods, which cup and buckle when basement humidity fluctuates. Specialists in modern vinyl solutions like Home Expo Asia demonstrate how durable, moisture-resistant vinyl planks protect lower levels from damp-related warping.
Selecting moisture-impervious assemblies from the subfloor up ensures that seasonal dampness never threatens your family’s finished living environment.

Overlooking Dedicated HVAC, Proper Ventilation, and Utility Access
Splicing into existing overhead ducts to warm a newly framed space is one of the costliest basement renovation mistakes to avoid. Most residential heating and cooling systems are precisely sized for your above-grade living areas. Tapping into those supply lines robs airflow from your primary bedrooms upstairs, leaving the second floor cold in winter while your lower level remains drafty and clammy. Conditioning subterranean rooms requires deliberate airflow engineering, not quick sheet-metal patches.
Drywalling directly over plumbing fixtures and electrical hardware creates significant maintenance problems down the road. Covering water main shutoffs, sewer cleanout plugs, or electrical junction boxes violates basic building maintenance codes. When an emergency pipe leak happens, plumbers need immediate access; they should never have to take a hammer to your new finished walls to locate a valve.
Conditioning Basement Air and Managing Relative Humidity
Basements naturally sit cooler than upper floors, which encourages higher relative humidity. Cold air settles near the slab, creating stagnant pockets prone to musty smells. Installing an independent heating and cooling solution, such as a multi-zone ductless mini-split system, gives you precise temperature control without unbalancing your central HVAC plant. Pairing this with a hardwired, continuously draining dehumidifier keeps ambient humidity levels below fifty percent year-round.
Preserving Critical Access to Plumbing and Electrical Infrastructure
Thoughtful mechanical planning blends seamless interior aesthetics with complete utility compliance. As you design the perimeter walls and drop ceilings, incorporate these functional measures:
- Flush Architectural Access Panels: Install paintable, magnetic access doors in drywall ceilings and walls wherever gas shutoffs, whole-house water valves, or cleanout pipes are situated.
- Mandatory Electrical Clearances: Maintain the required unobstructed working space in front of your main electrical service panel per local municipal guidelines, keeping the area entirely clear of permanent cabinetry.
- Combustion Air Ventilation: Frame dedicated utility rooms with louvered doors or fresh-air intake ducts to supply oil- or gas-fired boilers and water heaters with sufficient oxygen.
Designing Poor Lighting, Awkward Layouts, and Rushing Contractor Selection
Subterranean rooms easily turn dark and disjointed without intentional space planning and balanced illumination. Treating lighting as an afterthought remains one of the subtle basement renovation mistakes to avoid. A few basic ceiling fixtures often create harsh shadows and gloomy corners, leaving the space feeling like a finished utility cellar rather than an inviting living room. Creating a comfortable lower level requires thoughtful interior flow, strategic electrical layouts, and custom millwork that works around immovable structural elements.
Every basement floor plan must resolve unique physical hurdles, from central steel lally columns to low-hanging drain lines. Rather than viewing these obstacles as design flaws, seasoned remodelers incorporate them directly into the floor plan. Surrounding steel support posts with craftsman-style millwork, integrating them into functional half-walls, or building custom entertainment shelving turns awkward vertical posts into deliberate architectural highlights.
Layered Lighting Schemes and Architectural Space Planning
Low ceiling heights demand fixtures with minimal vertical profiles. Ultra-thin, canless wafer LED downlights recess directly into drywall ceiling planes, preserving precious headroom. To create a warm, inviting environment, layer your light sources across several zones:
- Ambient Downlighting: Space wide-beam recessed LED lights evenly across the ceiling on independent dimmer switches, targeting warm color temperatures between 2700K and 3000K.
- Task and Accent Lighting: Add under-cabinet LED strips along wet bars, place directional reading sconces near media seating, and install subtle step lights along stair runners.
- Reflective Surface Palettes: Choose satin or eggshell paint finishes in soft, neutral tones to bounce artificial illumination throughout windowless hallways and common areas.
Vetting Experienced Local Massachusetts General Contractors
Hiring a contractor solely based on the lowest bid often leads to project stalls, code violations, or poor finishes. Below-grade construction demands specialized knowledge of vapor drives, thermal breaks, and regional building inspectors. When interviewing builders in Saugus, Lynn, Peabody, or Danvers, ask for direct references from completed local basement remodels. You can learn more about our family-owned team and commitment to craftsmanship on our about page before breaking ground on your project.
Working alongside an established builder ensures your renovation runs smoothly through every permitting phase, rough inspection, and final walkthrough. When you are ready to explore layout concepts for your home, take time to request a project consultation with our local remodeling specialists.
Transform Your Basement with Confidence and Lasting Quality
Finishing a lower level transforms underutilized space into an inviting retreat, provided you build methodically from the bare concrete up. Addressing foundation vapor drive early, partnering with your local Massachusetts building department, and choosing inorganic, moisture-resistant materials are the most critical basement renovation mistakes to avoid. Taking these deliberate steps ensures your finished space stays dry, code-compliant, and comfortable through every New England season.
With over a decade of family-owned residential remodeling experience across Greater Boston and the North Shore, King Builders Remodeling manages each phase with care. We take the stress out of municipal permitting, structural framing, utility clearances, and custom finish carpentry, delivering an exceptional living area built on sound craftsmanship and genuine trust.
Your dream basement is well within reach; let’s build a safe, beautiful environment your family can enjoy for decades.
Frequently Asked Questions
Can I finish my basement walls with regular drywall and fiberglass insulation?
No, standard paper-faced drywall and cavity fiberglass batts should never touch exterior foundation walls. Ground moisture easily permeates foundation masonry, allowing trapped water vapor to dampen the fiberglass insulation and paper backing. This combination rapidly creates mold colonies behind your finished carpentry. Rigid foam panels or closed-cell spray insulation paired with moisture-resistant gypsum boards provide the necessary thermal break to keep wall cavities dry.
What happens if I finish my basement without a building permit in Massachusetts?
Unpermitted work carries steep financial and legal penalties from local building inspectors. Skipping official filings is one of the most critical basement renovation mistakes to avoid, as municipal inspectors can halt construction, issue fines, or demand the removal of completed drywall to view hidden rough-ins. Additionally, unpermitted space cannot be included in legal square footage during appraisals, complicating future real estate sales across Greater Boston communities.
How do I know if my concrete basement floor has hidden moisture problems?
Visible surface dryness often hides ongoing moisture vapor transmission migrating upward from underlying soil. You can test your slab by securely taping squares of heavy polyethylene sheeting across several bare concrete sections for two days. If water droplets bead beneath the plastic or the concrete darkens noticeably, vapor drive is active. Using a calibrated calcium chloride test kit offers an even more precise measurement before laying finished flooring.
Is an egress window legally required in a finished basement remodel?
An emergency egress opening is legally mandated whenever a basement renovation includes a designated sleeping area or bedroom. Under current Massachusetts building safety standards, this requirement ensures occupants have a direct, unobstructed path outdoors during emergencies. Egress window wells placed below yard grade require specific minimum dimensions and integrated ladders, though exact local guidelines should always be confirmed with your municipal building department.
Can I tie my new basement heating directly into my existing furnace ducts?
Tapping into existing supply trunks usually deprives upstairs living spaces of adequate airflow and heat. Central heating systems are engineered specifically for the cubic volume of above-grade rooms. Adding subterranean square footage creates severe temperature imbalances throughout your home. Installing dedicated heating zones, such as an efficient ductless mini-split system, delivers balanced climate control while preserving optimal airflow on your main levels.
What is the best flooring to install over a below-grade concrete slab?
Waterproof luxury vinyl tile and glazed porcelain tile represent the most dependable options for subterranean concrete. Solid hardwood expands, cups, and buckles against concrete vapor drive, making organic flooring one of the primary basement renovation mistakes to avoid. Installing an inorganic subfloor membrane with built-in vapor management elevates finishes off cold masonry, ensuring warm surfaces and long-term durability against seasonal Massachusetts dampness.
How much ceiling height is legally required for a finished basement room?
Habitable lower-level rooms generally require a minimum finished ceiling clearance of seven feet from the floor to the drywall. Local building codes often permit minor exceptions under structural beams, mechanical ducts, or plumbing drops, typically allowing clearances down to six feet four inches in localized paths. Because interpretations vary across North Shore communities, review your framing plans with the local town inspector before hanging ceilings.